Sunday 2 October 2016

Birds in the back !

I was playing with embossing powder on craft cardstock paper and created this birds background with clear embossing powder. Clear embossing powder works magic on craft cardstock. It gives a dewy watery feeling to the card. Here I card I made using my favorite lawn fawn winter sparrows stamp set. I dewy birds in the background is the highlight of this card. 


I have been making lots of cards recently and it's now all cluttered in my desk draw. I sent out few of them to my friends. Don't know what to do with the rest of it. Any suggestions? 


Thursday 1 September 2016

Happy Everything !

Hello beautiful people !

I made a simple card using Avery Elle laurels stamp set, Paper smooches simply said stamp set and winter sparrows stamp set by lawn fawn. So here I created the background using laurels stamp set, there was leaf image in it. The ink I used is Viridian by Ranger archival inks. It is a beautiful color. One of my favorites. I stamped the sentiment using paper smooches simply said stamp set in the colour yellow from the Hero arts kelly purkey dye ink cubes set. From the same set I used the green color to stamp the sparrow image from lawn fawn winter sparrows stamp set. Added a heart embellishment and that's it. 


Friday 26 August 2016

Mason Jar Card

Hey people !

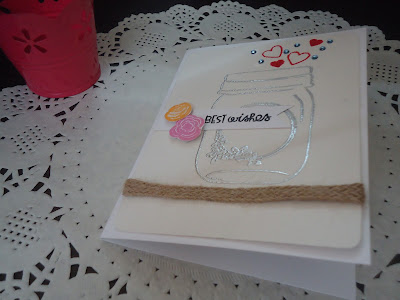
Today noon I spent making cards using heat embossing. This particular one turned out quite nice. Here I used Hampton art "flower frenzy" stamp. It is a simple mason jar stamp. The mason jar was heat embossed using silver embossing powder from Ranger. I kept it pretty simple. I stamped few red hearts from Bobunny "I heart stars" stampset and fuzzy cut few flowers using scissors. The flowers are from Avery Elle "Laurels" stamp set. The sentiment I used "best wishes" from Paper smooches "Simple said" stamp set. Added few blue gems along with the hearts. And to finish it off used a burlap twine. 


Thursday 25 August 2016

New cardsss !

Hey People !

Last week was pretty overwhelming. I completed my Masters degree and just moved back to my home. Two years doing masters went very fast. Those were two memorable years of my life. Anyway, I am not boring you guys with my nostalgic sentiments. Yesterday was my "un-packing" day and going through my craft boxes I couldn't help but make two cards. I had been waiting for a small break to play with my new stamp sets and my embossing powders. Heat embossing is fun but I must say I don't like the smell of the powder melting. So here are the cards I made. 


June and August 2016 : Updating my inventory

In June I made one huge craft purchase. Again I have been saving up for a while for this one. I am so excited about this one because this purchase was more about getting the basics. I brought the craft supplies from two online craft stores mainly. 

Store 1 : Itsy Bitsy 

Link: http://itsybitsy.in/

I am so happy with this website. They have a huge collection of goodies. Not just paper crafting supplies but baking...home decor...It's one amazing store. And their customer care helpline number is very prompt and efficient.

So from itsy bitsy I brought the following:

  1.  Wow embossing Heat Gun : This is something I was wanting to purchase for a very very long time now. But my budget kept me away from it. Anyway finally got my hands on them. It's just perfect. Now I can heat emboss my cards. So excited to have it.
  2. Baker's Twine : I can never get enough of these. It was on sale again. And I couldn't resist.  It was 10meters of 4 colors - green,baby pink, black and magenta.
  3. Corner Rounder : This was again on my 'to buy' list forever. And finally bought it.
  4. VersaMark watermark Ink : For heat embossing
  5. And two clear stamps which were on sale. Its by Studio G. 60rs per piece. I loved it. It was so cheap yet sooooo cute. 

Store 2 : Crafter's Corner 

Link: http://www.crafterscorner.in/

This was the first time I ordered from them. And I am quite happy with them. I will be buying more from them in the future for sure. 

  1.  Red Tacky tape 6mm 
  2. Ranger embossing powder in Silver and clear
  3. Lawn fawn mini stamp set -Winter sparrows: It is the cutest stamp set ever ♥ 
  4. A mason jar wood mounted rubber stamp called 'flower jar' by Hampton Art 
  5. Distress ink minis Kit 4. These have the mildest of the colors ever. Its perfect for a gentle play of colours. The colors are : Spun suger, scattered straw, evergreen bough and shaded lilac. 
In August I made another craft supplies order. This was from a website called craftAdda. 

Link: https://www.craftadda.com/

I have shopped with them a couple of times before and I keep going back to them. I especially like their craft embellishments . 

  1. Artistry Ink blending tool : I used to it. Have to say not satisfied with it. Maybe because I am still in the learning  phase to do ink blending properly. I don't know. Let's see.
  2. Paper smooches clear stamp - Simple said : I finally got another decent sentiments stamp set. It is perfect. I already started playing with it. It's so perfect. 
  3. Curved mini bucket in colors Baby pink and dark pink: Do check it out on their website. It's these tiny cute buckets in which you can store stuffs. 
  4. Enogreeting wrapping paper called 'Floral frenzy' : Most favorite purchase in the whole bunch . Awww the papers are so prettyyyy. Just love them. 

That's all folks. 


Sunday 26 June 2016

Happy Birthday Appu !

Next week my roommate is celebrating her birthday and this is a card I made for her. 

Hey girl if you are reading this post : HAPPY BIRTHDAY !!! 


Saturday 25 June 2016

A special Card

I made this card for my mom. It's one of my most favorite cards of the ones I made so far. 


I used paper smooching technique to make this card. Well, if you are new to card making I will elaborate. This technique is done using distress inks primarily. You also need an acetate sheet, water mister and watercolour paper too. Here I used distress ink colour 'Peacock feathers'. 


Wet the surface of your watercolour paper well with a brush. Press down your distress ink pad on to an acetate sheet. Now using a water mister spray on to the acetate sheet. Next step is to press down the acetate sheet on to the wet watercolour paper. The water will do the rest of the work. You can move your acetate sheet to give colour to the areas you prefer. Let the paper dry and you will get an amazing watercoloury background. 

The floral image and the sentiment is from Avery Elle Laurels stamp set. And to finish it off tied a black and white baker twine. And voila you have your card ! 

Until next time...
Ra